Part 3 - 네트워크 구조의 forward pass 구현하기
> Opencv DNN, Tensorflow, Pytorch로 YOLO v3를 구현해본 코드를 보려면 [Github repo](https://github.com/dojinkimm/Object_Detection_Video_DNN_Tensorflow_Pytorch) 를 참고하세요.
본문
지난 Part 2에서는 YOLO 구조에 사용되는 layer들을 구현했고, 이번 Part 3에서는 Pytorch로 YOLO 네트워크 구조를 구현해서 이미지가 주어졌을 때 결과를 생성해내는 코드를 작성할 것이다. 이번 Part의 목적은 네트워크의 forward pass를 디자인 하는 것이다.
해당 코드는 Python 3.5, Pytorch 0.4 에서 실행되게끔 디자인이 되었고, 이 Github repo에서 코드들을 볼 수 있다.
튜토리얼은 총 5 단계로 나뉘어져 있다:
1. Part 1 : YOLO가 어떻게 작동되는지 이해하기
2. Part 2 : 네트워크 구조의 layers들 구현하기
3. Part 3 : 네트워크의 forward pass 구현하기
4. Part 4 : Objectness 점수 thresholding과 non-maximum suppression(NMS)
5. Part 5 : 입력과 출력 pipeline 디자인하기
사전에 알아야할 지식
- Part 1과 2의 내용
- Pytorch 에 대한 기본 지식,
nn.Module,nn.Sequential,torch.nnparameter class들로 커스텀 구조를 어떻게 구현하는지에 대한 지식도 포함한다. - Pytorch에서 이미지를 다루는 방법
Defining The Network
이전에도 언급했듯이, Pytorch에서 커스텀 구조를 만들기 위해 nn.Module 을 사용한다. 이제 detector의 네트워크를 정의할텐데, darknet.py 에 다음과 같은 class를 추가한다.
class Darknet(nn.Module):
    def __init__(self, cfgfile):
        super(Darknet, self).__init__()
        self.blocks = parse_cfg(cfgfile)
        self.net_info, self.module_list = create_modules(self.blocks)
이 코드에서 nn.Module class를 subclass하고, class이름을 Darknet으로 지었다. 그리고 blocks, netinfo, modulelist를 초기화 했다.
Implementing the forward pass of the network
네트워크의 forward pass는 nn.Module class의 forward 메소드를 override해서 구현된다.
forward 는 2가지 목적을 가지고 있다. 첫 째는, 출력 결과를 계산하는 것이고, 둘 째는, 출력 detection feature maps이 더 쉽게 처리 될 수 있도록 transform(변형)시켜는 것이다(detection maps들이 여러 scale간 concatenate이 가능하게 transform 한다, 다른 dimension 들이기 때문에 transform되지 않으면 안된다).
    def forward(self, x, CUDA):
        modules = self.blocks[1:]
        outputs = {}   #We cache the outputs for the route layer
forward 는 3 개의 arguments를 인자로 받는다: self, 입력인 x , 그리고 CUDA, CUDA가 true이면 forward pass를 진행할 때 GPU로 가속화한다.
self.blocks[1:] 의 값을 modules에 저장을 한다. 이 때 self.blocks 전체를 저장하지 않는 이유는 self.blocks[0] 에는 net 의 정보가 들어있고 그 부분은 forward pass에 필요하지 않기 때문이다.
Route와 shortcut layer들은 이전 layer들에서 output maps를 필요로 하기 때문에 우리는 모든 layer의 output feature maps를 outputs 라는 dictionary에 chache(캐싱)을 한다. Key는 layer의 index이고 value는 feature map이다. (Dictionary는 key-value pair이다)
create_modules 함수에서 처럼 우리는 네트워크의 module들을 가지고 있는 module_list를 iterate하다. 여기서 주목해야 할 점이 module들이 configuration 파일과 같은 순서대로 append(추가)되었다는 것이다. 이는 우리가 단순히 입력을 run(실행)하면 각 modlue을 거쳐서 output을 얻을 수 있다는 것을 의미한다.
        write = 0
        for i, module in enumerate(modules):
            module_type = (module["type"])
Convolutional and Upsample Layers
Module이 convolutional이던지 upsample이면, 밑의 코드처럼 forward pass가 작동해야 한다.
            if module_type == "convolutional" or module_type == "upsample":
                x = self.module_list[i](x)
Route Layer / Shortcut Layer
Route layer의 코드를 보면 2가지에 case(part 2에서 설명 했듯이)에 따라서 다르게 처리될 수 있다. 두 개의 feature map들을 torch.cat 으로 concatenate 해야되는 경우에 2번째 argument(인자)를 1로 설정한다. 이렇게 하는 이유는 depth에 따라서 feature map들을 concatenate 하기 위해서이다 (Pytorch에서, convolutional layer의 입력과 출력은 B X C X H X W 형태를 가진다. Depth는 채널의 크기에 대응된다).
            elif module_type == "route":
                layers = module["layers"]
                layers = [int(a) for a in layers]

                if (layers[0]) > 0:
                    layers[0] = layers[0] - i

                if len(layers) == 1:
                    x = outputs[i + (layers[0])]

                else:
                    if (layers[1]) > 0:
                        layers[1] = layers[1] - i

                    map1 = outputs[i + layers[0]]
                    map2 = outputs[i + layers[1]]
                    x = torch.cat((map1, map2), 1)


            elif  module_type == "shortcut":
                from_ = int(module["from"])
                x = outputs[i-1] + outputs[i+from_]
YOLO (Detection Layer)
YOLO의 출력은 feature map의 depth와 bounding box 속성을 포함한 convolutional feature map이다. Cell에 의해 predict(예측)된 bounding box 속성들은 stack으로 하나씩 쌓인다. 만약 (5,6)에 위치한 cell의 2번째 bounding인에 접근을 하려면, map[5,6, (5+C): 2*(5+C)] 으로 인덱싱해서 할 수 있다. 하지만, 이 형태는 object confidence에 의해 thresholding을 하거나, 중심에 grid offsets를 추가하거나, anchors 적용할 때, 등등 출력을 처리할 때 매우 불편하다.
이 형태의 다른 문제점은 detection이 3가지 크기에서 이루어지는 만큼, prediction map의 크기가 다르다는 것이다. Feature map들의 크기가 다를지라도 출력에 대한 처리는 동일하게 이뤄져야 한다. 다른 3개의 tensor에 작업을 처리하는 것보다, 다 같은 tensor로 할 수 있다면 작업은 더 편할 것이다.
이러한 문제점을 해결하기 위해, 여기서는 predict_transform 이라는 함수를 만들었다.
Transforming the output
predict_transform 함수는 util.py 파일에 있고, Darknet class의 forward 함수에서 사용하기 위해 import를 해야한다.
밑에는 utils.py 파일의 코드이다.
# utils.py
from __future__ import division

import torch
import torch.nn as nn
import torch.nn.functional as F
from torch.autograd import Variable
import numpy as np
import cv2
predict_transform 은 5개의 인자를 전달받는다: prediction (출력 값), inp_dim (입력 이미지의 크기), anchors, num_classes, 그리고 옵션으로 설정 할 수 있는 CUDA flag이다.
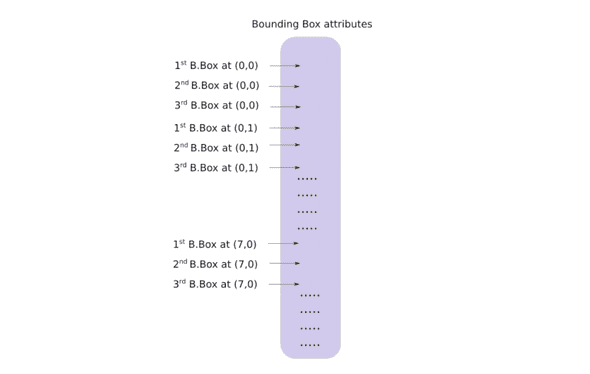
def predict_transform(prediction, inp_dim, anchors, num_classes, CUDA = True):predict_transform 함수는 detection feature map을 받아서 2-D tensor로 변환을 한다. Tensor의 각 행은 다음과 같은 순서로 bounding box 속성들에 대응된다.

밑에는 위 transformation에 대한 코드이다.
    batch_size = prediction.size(0)
    stride =  inp_dim // prediction.size(2)
    grid_size = inp_dim // stride
    bbox_attrs = 5 + num_classes
    num_anchors = len(anchors)

    prediction = prediction.view(batch_size, bbox_attrs*num_anchors, grid_size*grid_size)
    prediction = prediction.transpose(1,2).contiguous()
    prediction = prediction.view(batch_size, grid_size*grid_size*num_anchors, bbox_attrs)
Anchor의 크기는 net 블록의 높이 및 너비 속성을 따른다. 이 속성들은 detection map보다 더 큰(stride를 기준으로) 입력 이미지의 크기를 나타낸다. 그래서 detection feature map의 stride로 achors들을 나눠야 한다.
anchors = [(a[0]/stride, a[1]/stride) for a in anchors]이제, Part 1에서 말한대로 출력 결과를 특정 방정식에 따라 transform(변형)해야 한다. x,y 좌표와 objectness 점수를 sigmoid한다.
    # Sigmoid the  centre_X, centre_Y. and object confidencce
    prediction[:,:,0] = torch.sigmoid(prediction[:,:,0])
    prediction[:,:,1] = torch.sigmoid(prediction[:,:,1])
    prediction[:,:,4] = torch.sigmoid(prediction[:,:,4])
중심 좌표 prediction에 grid offsets를 더한다.
    #Add the center offsets
    grid = np.arange(grid_size)
    a,b = np.meshgrid(grid, grid)

    x_offset = torch.FloatTensor(a).view(-1,1)
    y_offset = torch.FloatTensor(b).view(-1,1)

    if CUDA:
        x_offset = x_offset.cuda()
        y_offset = y_offset.cuda()

    x_y_offset = torch.cat((x_offset, y_offset), 1).repeat(1,num_anchors).view(-1,2).unsqueeze(0)

    prediction[:,:,:2] += x_y_offset
Bounding box 크기에 anchors를 적용한다.
    # log space transform height and the width
    anchors = torch.FloatTensor(anchors)

    if CUDA:
        anchors = anchors.cuda()

    anchors = anchors.repeat(grid_size*grid_size, 1).unsqueeze(0)
    prediction[:,:,2:4] = torch.exp(prediction[:,:,2:4])*anchors
Class 점수에 sigmoid activation을 적용한다.
prediction[:,:,5: 5 + num_classes] = torch.sigmoid((prediction[:,:, 5 : 5 + num_classes]))마지막으로 이 함수에서 할 것은 detection map을 입력 이미지 크기에 맞게 resize 하는 것이다. Bounding box 속성들은 feature map에 맞게 size가 맞춰져있다 (예로 13x13). 만약 입력 이미지가 416x416이면, 속성들에 32 혹은 stride variable을 곱해준다.
prediction[:,:,:4] *= stride이것으로 함수의 body는 끝이고 prediction을 리턴한다.
return predictionDetection Layer Revisited
다시 YOLO(detection layer)로 돌아왔다. 출력 tensor들을 transform했으니 이제는 3개의 다른 크기를 가진 detection map들을 하나의 큰 tensor로 concatenate할 수 있게 되었다, 왜냐하면 출력 tensor가 table처럼 작동을 하고 tensor의 행이 bounding box를 나타내기 때문이다.
한 가지 남아있는 문제는, 비어있는 tensor를 초기화하고 거기에다 비어있지 않은 다른 크기의 tensor를 concatenate 할 수 없다는 것이다. 그래서 첫 번째 detection map을 받기 전까지 collector(detection을 가지고 있는 tensor)의 initialization 작업을 딜레이시킨다. 받고 나서 뒤에 오는 detections들을 map에다 concatenate한다.
forward 함수의 loop 시작 전에 write = 0 내용이 있음을 알 수 있다. 이 write flag는 첫 번째 detection을 마주했는지 나타낸다. 만약 write 가 0이면 collector가 아직 초기화되지 않았다는 것을 의미한다. 1 이면, collector가 초기화되었었고 이제 detection map을 concatenate할 수 있음을 의미한다.
predict_transform 함수를 완성했기에 detection feature map을 다룬는 forward 함수를 완성시킬 수 있다. darknet.py 맨 위에 import를 해야한다.
from util import *그 다음 forward 함수 밑에 해당 코드를 더해줘야 한다.
            elif module_type == 'yolo':
                anchors = self.module_list[i][0].anchors
                #Get the input dimensions
                inp_dim = int (self.net_info["height"])

                #Get the number of classes
                num_classes = int (module["classes"])

                #Transform
                x = x.data
                x = predict_transform(x, inp_dim, anchors, num_classes, CUDA)
                if not write:              #if no collector has been intialised.
                    detections = x
                    write = 1

                else:
                    detections = torch.cat((detections, x), 1)

            outputs[i] = x
마지막으로는 detections를 리턴한다.
return detectionsTesting the forward pass
이 코드는 dummy 입력을 만들어내는 코드이다. 해당 입력을 네트워크에 전달할 것이다. 코드 작성 이전에 입력으로 사용될 이미지가 작업하고 있는 디렉토리에 존재해야 한다. 이 이미지를 다운 받던지 밑에 명령어를 작성해서 다운을 받는다.
wget https://github.com/ayooshkathuria/pytorch-yolo-v3/raw/master/dog-cycle-car.png이제 testing하는 함수를 밑과 같이 darknet.py 파일 위에 작성한다:
def get_test_input():
    img = cv2.imread("dog-cycle-car.png")
    img = cv2.resize(img, (416,416))          #Resize to the input dimension
    img_ =  img[:,:,::-1].transpose((2,0,1))  # BGR -> RGB | H X W C -> C X H X W
    img_ = img_[np.newaxis,:,:,:]/255.0       #Add a channel at 0 (for batch) | Normalise
    img_ = torch.from_numpy(img_).float()     #Convert to float
    img_ = Variable(img_)                     # Convert to Variable
    return img_
다음에 밑에 코드를 작성해서 testing을 한다.
model = Darknet("cfg/yolov3.cfg")
inp = get_test_input()
pred = model(inp, torch.cuda.is_available())
print (pred)
print의 결과는 다음과 같을 것이다.
(  0  ,.,.) =
   16.0962   17.0541   91.5104  ...     0.4336    0.4692    0.5279
   15.1363   15.2568  166.0840  ...     0.5561    0.5414    0.5318
   14.4763   18.5405  409.4371  ...     0.5908    0.5353    0.4979
               ⋱                ...
  411.2625  412.0660    9.0127  ...     0.5054    0.4662    0.5043
  412.1762  412.4936   16.0449  ...     0.4815    0.4979    0.4582
  412.1629  411.4338   34.9027  ...     0.4306    0.5462    0.4138
[torch.FloatTensor of size 1x10647x85]
Tensor는 1 x 10647 x 85 형태이다. 첫 번째인 1은 batch 크기를 의미하는데, 현재 하나의 이미지만 사용했기 때문에 그러한 값이 나온는 것이다. Batch의 각 이미지당 10647 x 85 크기의 테이블을 갖게 된다. 테이블의 행은 bouding box를 나타낸다 (4 bbox 속성, 1 objectss 점수, 그리고 80 class 점수).
이 시점에서 네트워크는 랜덤한 weights를 갖기 때문에 정확한 결과가 나오지 않는다. 정확한 결과값을 얻기 위해서는 공식 사이트에서 제공하는 weight 파일을 네트워크에서 사용해야 한다.
Downloading the Pre-trained Weights
Weight파일을 작업중인 디렉토리에 다움을 받는다. 여기 눌러서 바로 다운 받을 수 있고 터미널에서 다운 받고 싶으면 밑의 명령을 작성한다,
wget https://pjreddie.com/media/files/yolov3.weightsUnderstanding the Weights File
공식 weights 파일은 바이너리 파일이고 weights들이 serial(연속적인) 모양으로 저장되어 있다.
해당 파일을 읽으려면 매우 조심해야 한다, weights들은 floats로 저장되어있고 어떤 layer에 속하는지에 대한 가이드가 없기 때문이다. 만약 잘못해서 꼬이게 되면, batch norm layer의 weight를 convolutional layer에 잘못 설정하는 것 같은 상황이 생길 수 있다. 그렇기 때문에 weights들이 어떤 방식으로 저장되어있는지 이해를 하는 것이 중요하다.
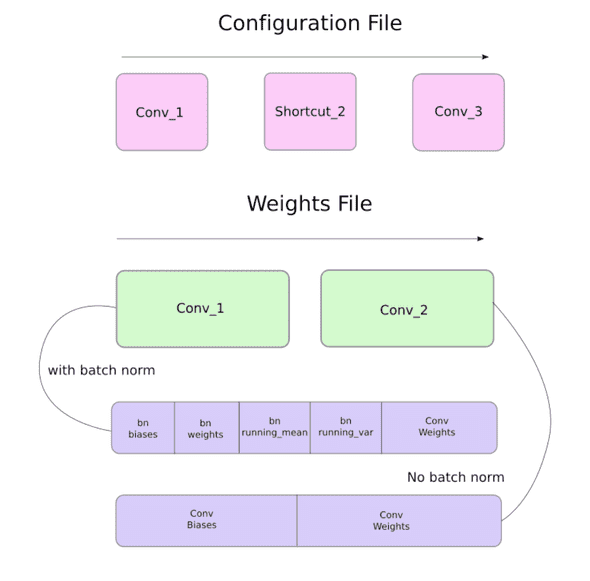
일단, weights들은 2 종류의 layer에만 속한다: batch norm layer 혹은 convolutional layer.
Configuration 파일에 나타나는 것과 정확하게 같은 순서로 layer들의 weight들이 저장되어있다. Batch norm layer가 convolutional 블록에 나타날 때는 bias가 없다. 하지만, batch norm layer가 없다면 bias "weights"가 파일에서 읽혀와야 된다.
밑에 다이아그램은 weight가 어떻게 저장되는지 설명해준다.

Loading Weights
load_weights 라는 함수를 Darknet class의 멤버 함수로 작성할 것이다. 이 함수는 self 이외에 weights파일의 경로만 인자로 받아들인다.
def load_weights(self, weightfile):Weight 파일의 첫 160 bytes는에서 파일의 헤더에 해당되는 5개의 int32값을 저장한다.
    # Open the weights file
    fp = open(weightfile, "rb")

    # The first 5 values are header information
    # 1. Major version number
    # 2. Minor Version Number
    # 3. Subversion number
    # 4,5. Images seen by the network (during training)
    header = np.fromfile(fp, dtype = np.int32, count = 5)
    self.header = torch.from_numpy(header)
    self.seen = self.header[3]
그 외에 나머지 bits들은 weight를 나타낸다. Weights는 float32 혹은 32-bit floats로 저장되어 있다. 나머지 weights들은 np.ndarray 로 load를 할 것이다.
weights = np.fromfile(fp, dtype = np.float32)그 다음에 weights 파일을 iterate하면서 weights를 네트워크의 module에 load를 한다.
    ptr = 0
    for i in range(len(self.module_list)):
        module_type = self.blocks[i + 1]["type"]

        #If module_type is convolutional load weights
        #Otherwise ignore.
Loop안에서 가장 먼저 convolutional 블록이 batch_normalise 를 지니는지 확인을 한다. 이 정보를 바탕으로 weights를 load한다.
        if module_type == "convolutional":
            model = self.module_list[i]
            try:
                batch_normalize = int(self.blocks[i+1]["batch_normalize"])
            except:
                batch_normalize = 0

            conv = model[0]
ptr 이라는 변수로 weights array의 어느 위치에 있는지 계속 추적을 한다. 만약 batch_normalize 가 True이면 밑과 같이 weight를 load한다.
                if (batch_normalize):
                    bn = model[1]

                    #Get the number of weights of Batch Norm Layer
                    num_bn_biases = bn.bias.numel()

                    #Load the weights
                    bn_biases = torch.from_numpy(weights[ptr:ptr + num_bn_biases])
                    ptr += num_bn_biases

                    bn_weights = torch.from_numpy(weights[ptr: ptr + num_bn_biases])
                    ptr  += num_bn_biases

                    bn_running_mean = torch.from_numpy(weights[ptr: ptr + num_bn_biases])
                    ptr  += num_bn_biases

                    bn_running_var = torch.from_numpy(weights[ptr: ptr + num_bn_biases])
                    ptr  += num_bn_biases

                    #Cast the loaded weights into dims of model weights.
                    bn_biases = bn_biases.view_as(bn.bias.data)
                    bn_weights = bn_weights.view_as(bn.weight.data)
                    bn_running_mean = bn_running_mean.view_as(bn.running_mean)
                    bn_running_var = bn_running_var.view_as(bn.running_var)

                    #Copy the data to model
                    bn.bias.data.copy_(bn_biases)
                    bn.weight.data.copy_(bn_weights)
                    bn.running_mean.copy_(bn_running_mean)
                    bn.running_var.copy_(bn_running_var)
만약 batch_normalize 가 False이면, convolutional layer의 bias만 더해준다.
                else:
                    #Number of biases
                    num_biases = conv.bias.numel()

                    #Load the weights
                    conv_biases = torch.from_numpy(weights[ptr: ptr + num_biases])
                    ptr = ptr + num_biases

                    #reshape the loaded weights according to the dims of the model weights
                    conv_biases = conv_biases.view_as(conv.bias.data)

                    #Finally copy the data
                    conv.bias.data.copy_(conv_biases)
제일 마지막으로 convolutional layer의 weight를 load 한다.
                #Let us load the weights for the Convolutional layers
                num_weights = conv.weight.numel()

                #Do the same as above for weights
                conv_weights = torch.from_numpy(weights[ptr:ptr+num_weights])
                ptr = ptr + num_weights

                conv_weights = conv_weights.view_as(conv.weight.data)
                conv.weight.data.copy_(conv_weights)
이로써 함수 작성이 끝났고 Darknet 객체에서 load_weights 함수를 호출해서 weight를 load할 수 있게 되었다.
model = Darknet("cfg/yolov3.cfg")
model.load_weights("yolov3.weights")
이 것으로 Part3은 마무리가 됐다. Model이 만들어졌고 weights도 load되었기 때문에 이제 objects를 detect할 수 있게 됐다. 다음 Part4에서는 objectness confidence thresholding과 non-maximum suppression으로 detections 하는 방법을 다룰 것이다.
